
People who own pets can give their animals a safe place to walk without using a standard fence. A wireless fence is a creative and useful way to do this. It has a main control unit that tells a pet’s collar to do something. This collar creates a barrier around the property that the pet can’t cross. People who want to keep their pets safe and happy while still letting them explore often choose wireless fences because they are safe, easy to set up, and work well.
Benefits Of A Wireless Fence
The fact that you don’t have to dig is one of the best things about a wireless fence. The limits can be set up without having to lay down lines or build a wall. All you have to do is plug in the control box. If you rent your home or don’t want to spend money on a more standard fence, this is a great option.
A wireless fence also makes it safe and easy for cats to move and play within a set area because it doesn’t need actual fences. Without a physical obstruction, pets can enjoy their time outdoors without feeling trapped or enclosed. With a wireless boundary, pets can enjoy the freedom to explore and get exercise while staying within the set boundary.
Another benefit of a wireless fence is that it keeps pets away from flower beds, swimming pools, and other barriers without causing them any physical pain. The fence doesn’t use shocks or other harsh ways to let your pets know when they’ve gone too far. On the other hand, it uses mild signs and warnings. This is a nice, safe way to keep cats in one place without being mean to them.
Installing The Fence
If you want to keep your pets safe and comfortable without the trouble of putting up a permanent fence, a movable fence is a great option. This guide will show you how to set up a wireless fence the right way, step by step. It will cover the tools you’ll need, the mixing process, and some important safety tips. By following these tips, you can make a safe fence around your pets’ open space that will let them enjoy it without worrying about their safety.
Unspool The Boundary Wire Around The Perimeter Of Your Property
There are several steps to installing a wireless fence system. One of them is unwinding the boundary wire around your land. The border wire is an important part of the system because it sets the limits of where your dog can go. To make sure the wireless fence system works, the border wire must be installed properly.
Put the border wire on the ground at the emitter to start. Watch out for corners that are too sharp and could block the signal. Next, look for any unique features along the line of the border, like flower beds, ponds, or trees. To get around these problems, you might need special tools and supplies to continue with the work.
Then, determine the additional wires that you’ll need to splice in the extra wire as required to go around the obstacles. Once all the wires are ready, bury the boundary wire in a shallow trench using a garden spade, and then replace the soil and turf. This is to ensure that the wire is concealed and won’t cause any disturbance while mowing the lawn. At intervals, make use of the flags provided to mark the location of the wire.
Securely Attach The Wire To Posts Or Other Structures As Needed
To ensure that your wireless fence system is working properly, you need to attach the boundary wire securely to any posts or structures along its path. This step is important because it helps to prevent accidental damage to the wire and also eliminates signal interference.
The most common structures where you may need to attach the boundary wire include trees, fence posts, and house exteriors. To attach the wire to these structures, you can use wire clips or nails. However, be careful not to damage the structures in the process.
When attaching the wire to trees, use wire clips or nails to wrap the wire around the tree trunk, taking care to avoid damaging the bark. For fence posts, you can use wire clips to attach the wire to the post. Make sure to attach the wire at a height that is appropriate for your pet’s size so that the collar will beep or trigger in time to prevent escape.
For house exteriors, use wire clips or nails to attach the wire to the house’s siding or foundation, taking care not to damage any wires or pipes that may be present. Keep in mind that any potential obstacles along the boundary line, like gates or staircases, may require you to adjust the wire accordingly.
By attaching the boundary wire securely to posts or structures, you’ll help ensure that the wireless fence system performs its intended function. This element of installation is crucial, so be sure to take your time and complete it carefully.
Connect All Ends Of the Boundary Wire Into A Continuous Loop
Connecting all ends of the boundary wire into a continuous loop is an important step in installing a wireless fence. A continuous loop ensures that the signal can flow uninterrupted through the boundary wire, allowing the collar to detect when your pet is approaching or crossing the perimeter.
To begin, ensure that your transmitter is plugged into a power outlet and turned on. Next, starting at the transmitter, unspool the boundary wire and lay it around the perimeter of your property, making sure to avoid any underground utilities or flower beds.
When you reach the end of your boundary wire, cut it and strip the ends of both wires that you plan to connect. It’s important to make sure that the ends are stripped cleanly and that no wires are frayed or exposed.
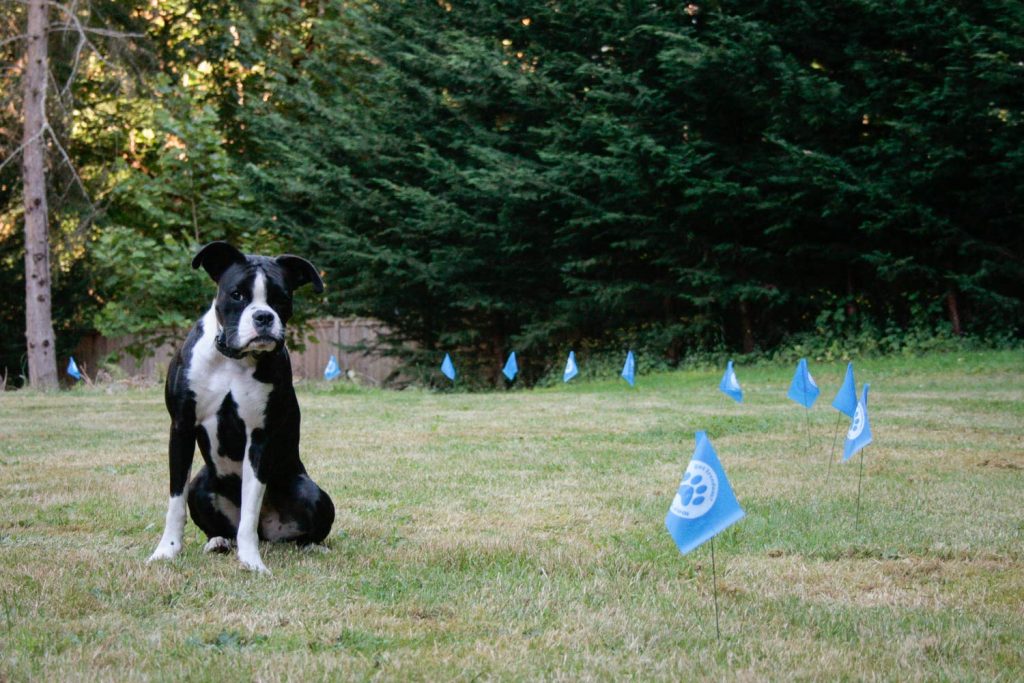
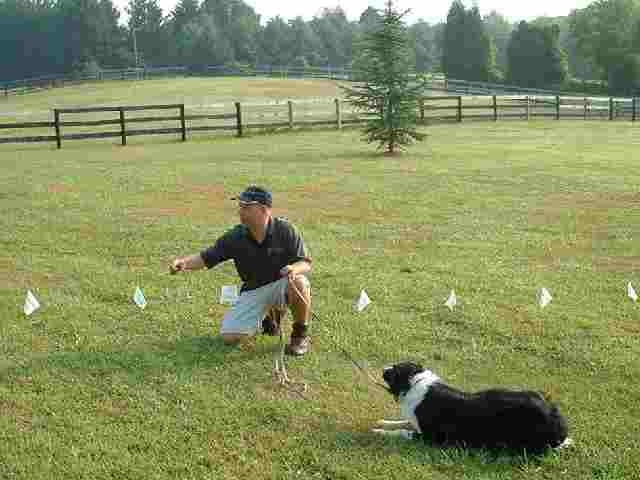
Place Flags At Strategic Locations Along The Boundary Line To Visually Guide Your Pet
To ensure your dog understands where the boundary line of the wireless fence lies during the initial training phase, it’s crucial to place flags at strategic intervals along the perimeter.
Using small garden or boundary flags, place them into the ground at strategic locations where you want your dog to avoid crossing. These flags will act as a visual guide, helping your pet understand where the boundary of their designated area is.
Be sure to properly space the flags out, so your dog can easily recognize and understand the boundary line. Over time, as your dog becomes more comfortable and trained within the designated area, you can begin to remove the flags.
Dig Trenches As Needed To Lay The Boundary Wire And Bury It
If you want to learn how to install a wireless fence, one of the most important steps is laying and burying the boundary wire around the perimeter of your property. To do this, you will need to dig trenches at strategic locations where the wire needs to cross over surfaces like concrete or gravel walkways.
The first step is to use a spade to dig a shallow trench around the boundary of your property. As you dig the trench, be sure to drop the boundary wire into it and backfill it with soil and turf to ensure that the wire is buried completely.
In situations where the trench needs to cross over a concrete surface, you will need to use a circular saw with a masonry blade to cut a shallow trench. Once the trench is cut, drop the wire in and backfill the trench with a patching compound to cover it up.
If the trench needs to cross over a gravel walkway, you can use a mini sledgehammer to tap a 3/4-inch PVC pipe under the walkway. Once the pipe is in place, feed the wire through it and cap the leading end of the pipe, ensuring that it remains secure.
After you have dug the trenches and laid the boundary wire, be sure to bury it completely to give your pets a seamless experience. This will prevent the wire from becoming a tripping hazard or being exposed to any other potential hazards.
Use Masonry Blade On Saw To Cut Through Driveways, Sidewalks, Or Flower Beds As Necessary
When installing your wireless fence, it may be necessary to cross over areas such as driveways, sidewalks, or flower beds. In such cases, you will need to use a circular saw with a masonry blade to cut a shallow trench into these surfaces.
The first step is to mark the boundary line where you need to place the wire underneath driveways, sidewalks, or flower beds. Once you have marked the line, you can use a circular saw with a masonry blade to cut a line into the surface.
When using the saw, be sure to cut horizontally and about an inch or two deep. This will allow for the safe placement of the wire underneath.
After cutting the trench, arrange the wire inside it, making sure it is not exposed and that it is tucked inside securely. Finally, fill in the trench with soil and any concrete patching compound that may be needed.
It is crucial to take extra care when cutting through driveways, sidewalks, or flower beds, as these are typically high-traffic areas. Be sure to take all necessary precautions to prevent accidents or injuries during the installation process.
Conclusion
In conclusion, installing an underground dog fence can provide pet owners with a safe and effective way to keep their pets within a designated area. This wireless fence system offers several benefits, including easy installation and customization to fit various lot shapes and sizes. By following the instructions to mark the boundary line, cut a trench, and arrange the wire, pet owners can complete the installation process with ease.